Frequently Asked Questions
Plans and Pricing
When you subscribe to Fluxguard, you will receive an allotment of credits every month. These will reset on the date of your subscription start. Unused credits do not carry-over.
Each crawled page results in the deduction of 1 credit. For example, if your site has 10 pages, and you crawl each page once per day, 300 credits will be used per month. If you crawl twice per day, it will cost 600 credits per month, etc.
Optional features cost additional credits:
| Page crawl | 1 credit per page crawled |
| Prioritize and summarize with Fluxguard AI | 3 add’l credits per new version (GPT-3.5) 5 add’l credits per new version (GPT-4o) |
| Translate into English | 4 add’l credits per page crawled |
| Enhanced proxy | 4 add’l credits per page crawled |
| Super-enhanced proxy | 9 add’l credits per page crawled |
| AI overview | 5 add’l credits per email (GPT-4o) Summary of summaries. Utilizes Fluxguard AI to distill detected changes in each email into a single high-level overview. |
| Ai-guided link harvesting | 10 add’l credits per page crawled |
Yes. Please contact us at [email protected] (new clients) or [email protected] (current clients) to make arrangements. For simplicity, invoices are generated for a 12-month period.
Yes. You can purchase an annual plan through our pricing page or contact us at [email protected] (new clients) or [email protected] (current clients).
If payment is made through Stripe, a receipt is emailed every time a payment is received. If one is amiss, or to change the billing email address, please contact us at [email protected].
Please contact us to include your VAT number and a reverse charge notice on all future receipts.
All plans come with automated help through our interactive chatbot, and your account manager is available at [email protected] if you need any account-related assistance.
If you’re interested in increasing your level of support or adding implementation services to your plan, please reach out to [email protected] — we’d be happy to discuss the options with you
Yes. You may cancel at any time and the plan will not renew after your billing period ends. (Unused credits will not be refunded.) There are no long-term commitments when you subscribe to one of our monthly self-service SaaS plans.
Crawling and Configuration
Fluxguard charges 1 credit per page crawled. Thus, determine the frequency you want to crawl and the approximate number of pages. For instance, if the site has 10 pages, and you wish to crawl it every hour, it will necessitate 240 credits per day (or 7200 credits per month).
If you’re concerned about credit usage, set up different crawl frequencies for specific areas of the site. For example, the home page and key pages might be crawled every hour; while old press releases and other areas might be crawled once per week. This approach can minimize credit usage.
Yes. Fluxguard leverages headless Google Chrome. All assets are loaded, including CSS, Javascript, images, fonts, etc. This is also known as dynamic crawling.
We capture the HTML after the Javascript executes: as such, we often refer to this as the “rendered DOM” as any DOM modifications made by scripts are included. This is worthwhile as it ensures correct monitoring of the entire content payload, not just the initial HTML which may not include interactive text.
You can also instruct Fluxguard to insert and execute specific Javascript on each page. This is useful to help transform the page content into a form more suitable for certain monitoring use cases.
Yes. You can customize the user-agent header field to your liking. This can be effective to whitelist our crawlers in a Web Application Firewall (WAF), for instance.
Yes. You can specify time ranges when crawling should occur: for instance, crawl this site between 2pm and 6pm.
Yes. This feature was developed to support customers who need to monitor geo-restricted or other difficult content.
Fluxguard supports this use case with a multitude of crawling locations, including North America, EU, Asia, UK, and multiple enhanced proxy options.
- Go to Session Settings for the site you wish to adjust proxy settings for. To can get to Session Settings in a few different ways:
- From the Dashboard, find the site you wish to adjust proxy settings for. To its right, look for the 3-dot icon. Click on this and select Session Settings. If you don’t see the 3-dot menu icon, make sure you are in Detailed View (click the corresponding icon to swap to this view in the center top of the Dashboard).
- Go to the Session View for the site you wish to adjust and click the gear icon to open Session Settings.
- Click the Crawl tab. This is where you can configure user-agent, proxy, and various other settings.
- Find the Proxies section and adjust as needed. This is a subscriber-only feature, so you will need to make sure your account is properly upgraded.
- Need enhanced proxy support? Contact us.
No. Such rapid crawling may be construed as a denial of services (DDoS) attack. Our software is designed for business users to monitor their digital assets and third-party regulatory or competitor sources. We do not support use cases that rely on extremely rapid crawling, such as festival tickets, apartment or university course availabilities, equity trading, and so on.
Yes. However you should reconsider this approach. Such rapid crawling is expensive and of limited value. For example, do you have a remediation team to handle alerts 24/7? Probably not. Moreover, is monitoring the deep recesses of your site at such high frequency beneficial? Probably not, and this may also result in a lot of noisy false-positives.
It is best to divide monitored pages by priority. Key content – such as the home page, executive biographies, and so on – can be monitored fast. Second and third-tier content can be checked once a week, for instance. This approach reduces false-positives, lends itself to realistic remediation, and is less expensive.
Go to the Site View (use the breadcrumbs navigation if you are already at the Session or Page View). Turn off “Monitoring status” for a second or two. Then turn it back on. This will reset any in-progress crawls.
Fluxguard crawls about 1 page per minute. We employ a series of automated guardrails to minimize the impact on third-party sites. As such, crawling fluctuates in speed from time to time.
We allow site verification to bypass crawling limits. Once verified, we crawl site content at a faster rate. However, Fluxguard will still crawl site content sequentially. This is to instrument appropriate multi-page orchestration to support synthetic transaction monitoring. As such, crawling will be as fast as each page loads.
By default, when you enter a top-level URL in Fluxguard, the home page is crawled and up to 75 internal links per page per crawl are extracted. These additional internal links are presented to you as newly found links. We present up to 75 total newly found links per monitored session.
You can choose to enable monitoring for some, all, or none of these discovered internal links. When you activate or delete newly found links, we will find more for you. And so on. Through this procedure, you can quickly monitor an entire site. Each activated URL will be crawled and monitored on the next crawl.
However, the reason that this process is semi-manual is that it generally does not make sense to monitor every page on any given site for changes. Do you need to monitor press releases from 2009? Probably not. The more you monitor, the more false-positives you may receive. It is for this reason that we recommend you select the minimum number of pages necessary for your change monitoring use case.
In some cases, it may make sense to automate monitoring of newly found links. To do this, open Session Settings, go to the Discovery tab, and adjust the Link Harvesting option to auto-monitor.
Note that you can adjust the discovered URLs to only those that match certain string patterns. This is useful if you know you are only looking to monitor pages of a certain type.
For users who enable auto-monitoring of new URLs, you can prevent Fluxguard from discovering many 1000s of new URLs. To do this, go to Account Settings and adjust the upper limit option.
Learn more about filtering content from monitoring.
CSS selectors are special instructions browsers utilize to identify an area of a web page. They can look a bit intimidating, but they’re quite simple. For example:
#elementidentifies an element by its id.elementidentifies an element by its classdiv > div > div > div > aidentifies an element by its hierarchical location in a document
Fluxguard utilizes CSS selectors to filter areas to ignore or focus on. This is a powerful technique to isolate the content you wish to monitor, while ignoring frequently changing areas that introduce false-positive change alerts.
It is possible to discover the CSS selector for any area of a page in 2 ways:
- Use the Visual Selector to find a CSS selector. Click on the button next to the first field in the modal to open the Visual Selector. This will use the most recently captured version of the page (so, make sure you’ve done an initial crawl before using it on any given page). It will open this page in a new browser, and prompt you to identify the areas to filter.
- This powerful feature renders the target site through our API as a means to identify DOM areas. As such, it may not work on every web page. Please let us know if you encounter a page where it does not seem to work well. In the meantime, try the alternative method detailed below. (In fact, the approach below is the one we use as it allows for more flexibility in selector creation.)
- Use Google Chrome to identify a CSS selector. This requires only minimal HTML knowledge, so you can often do this yourself.
- Using Google Chrome (or another modern browser).
- Go to the live page with the area you wish to filter.
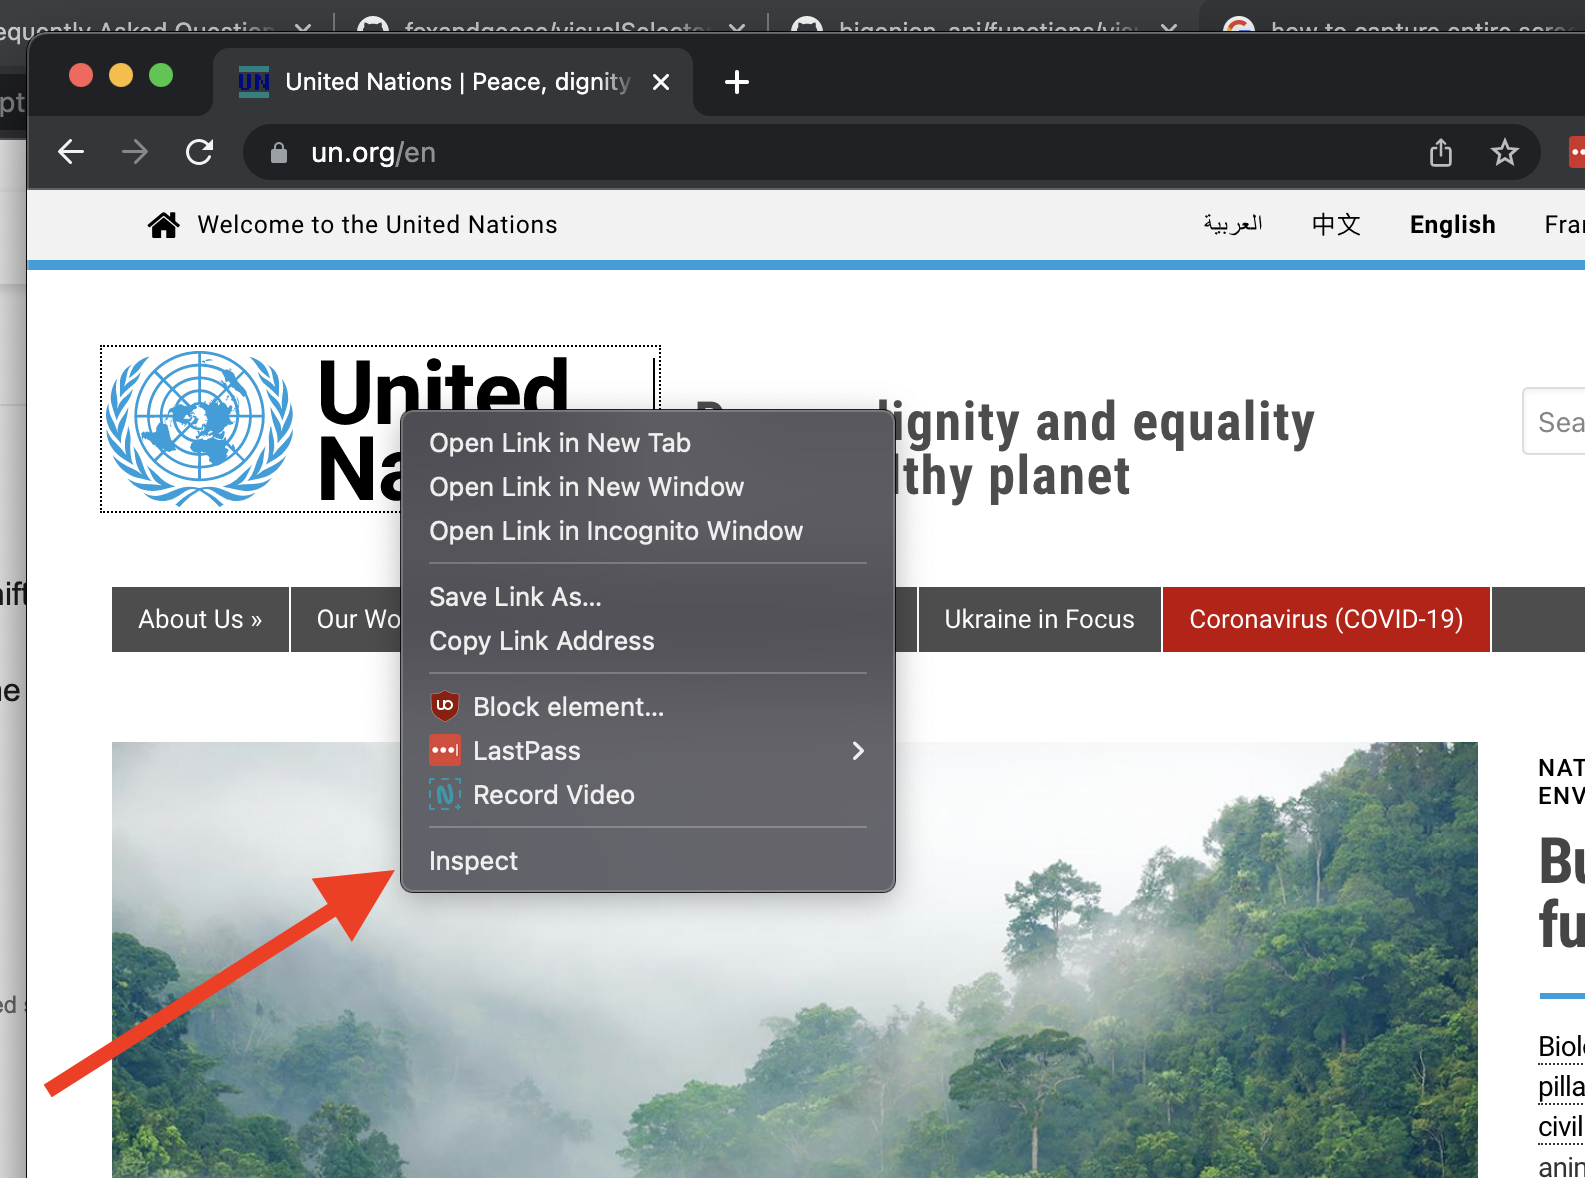
- Right-click on the area to filter and select “Inspect.”
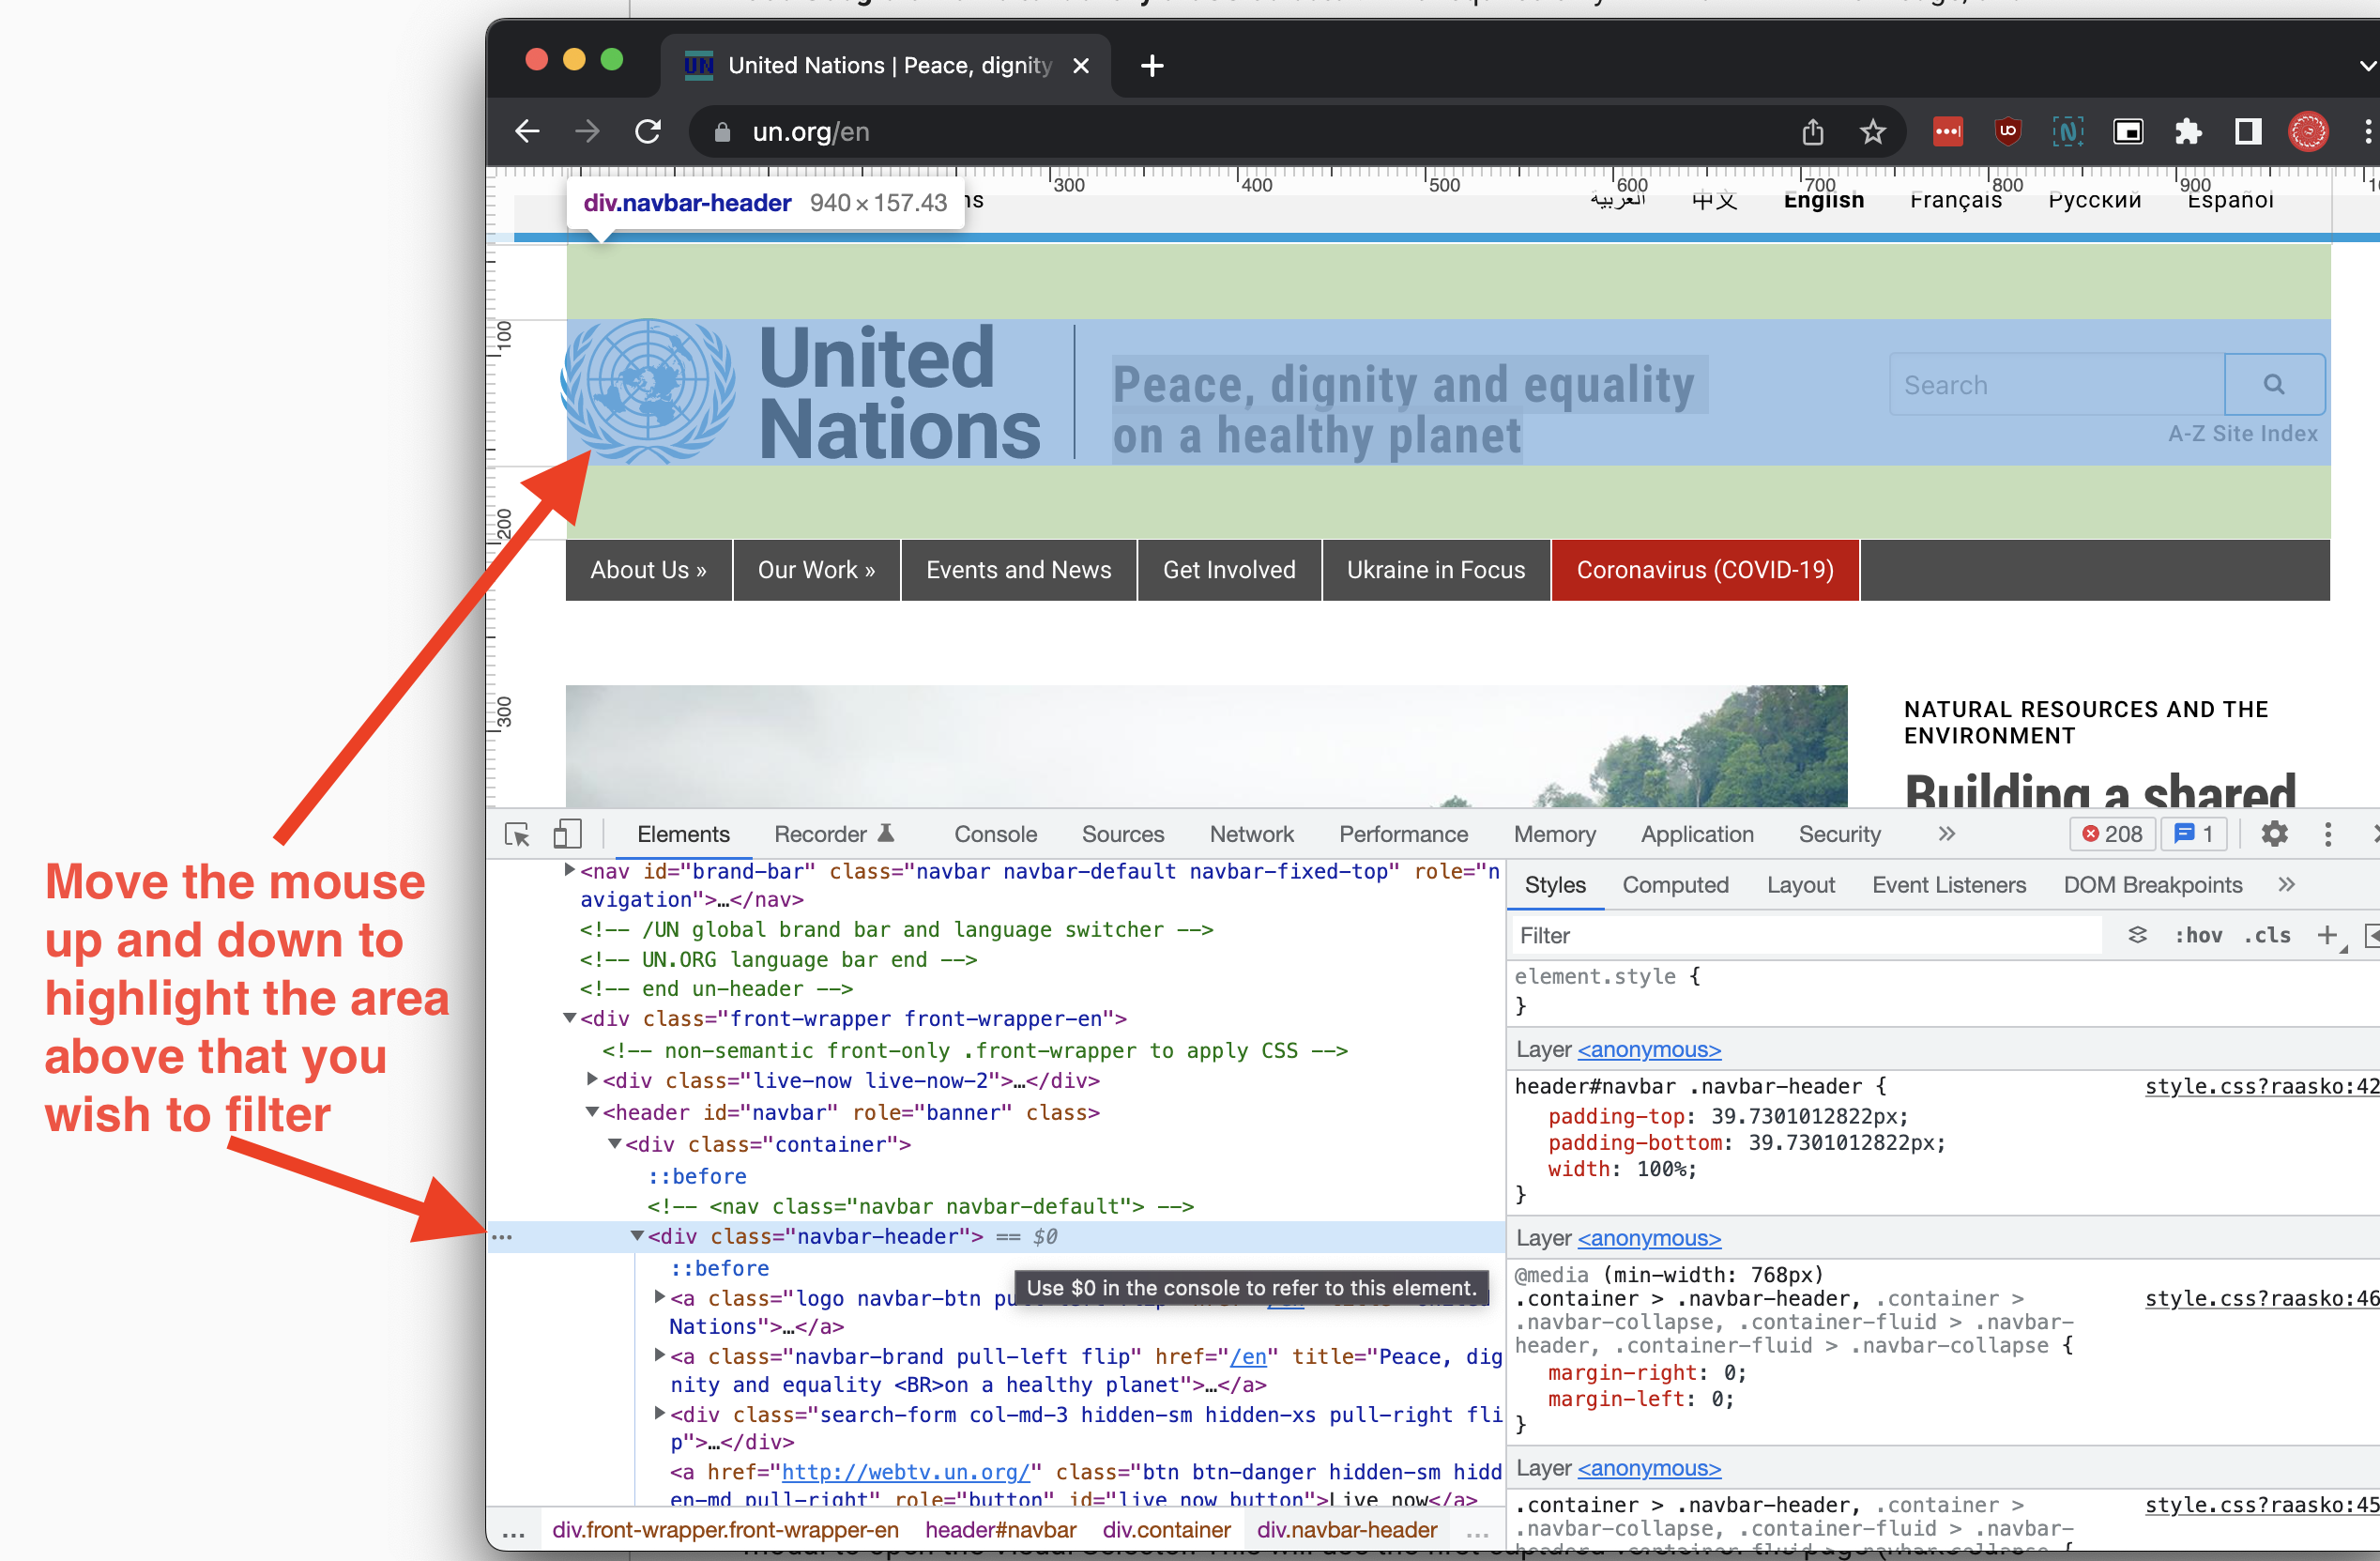
- A code console will appear. Move your mouse up and down in this console. Notice that it highlights different sections of the page.
- Mouse up and down in the code console until you isolate the element you want to filter in the browser viewing part of the display.
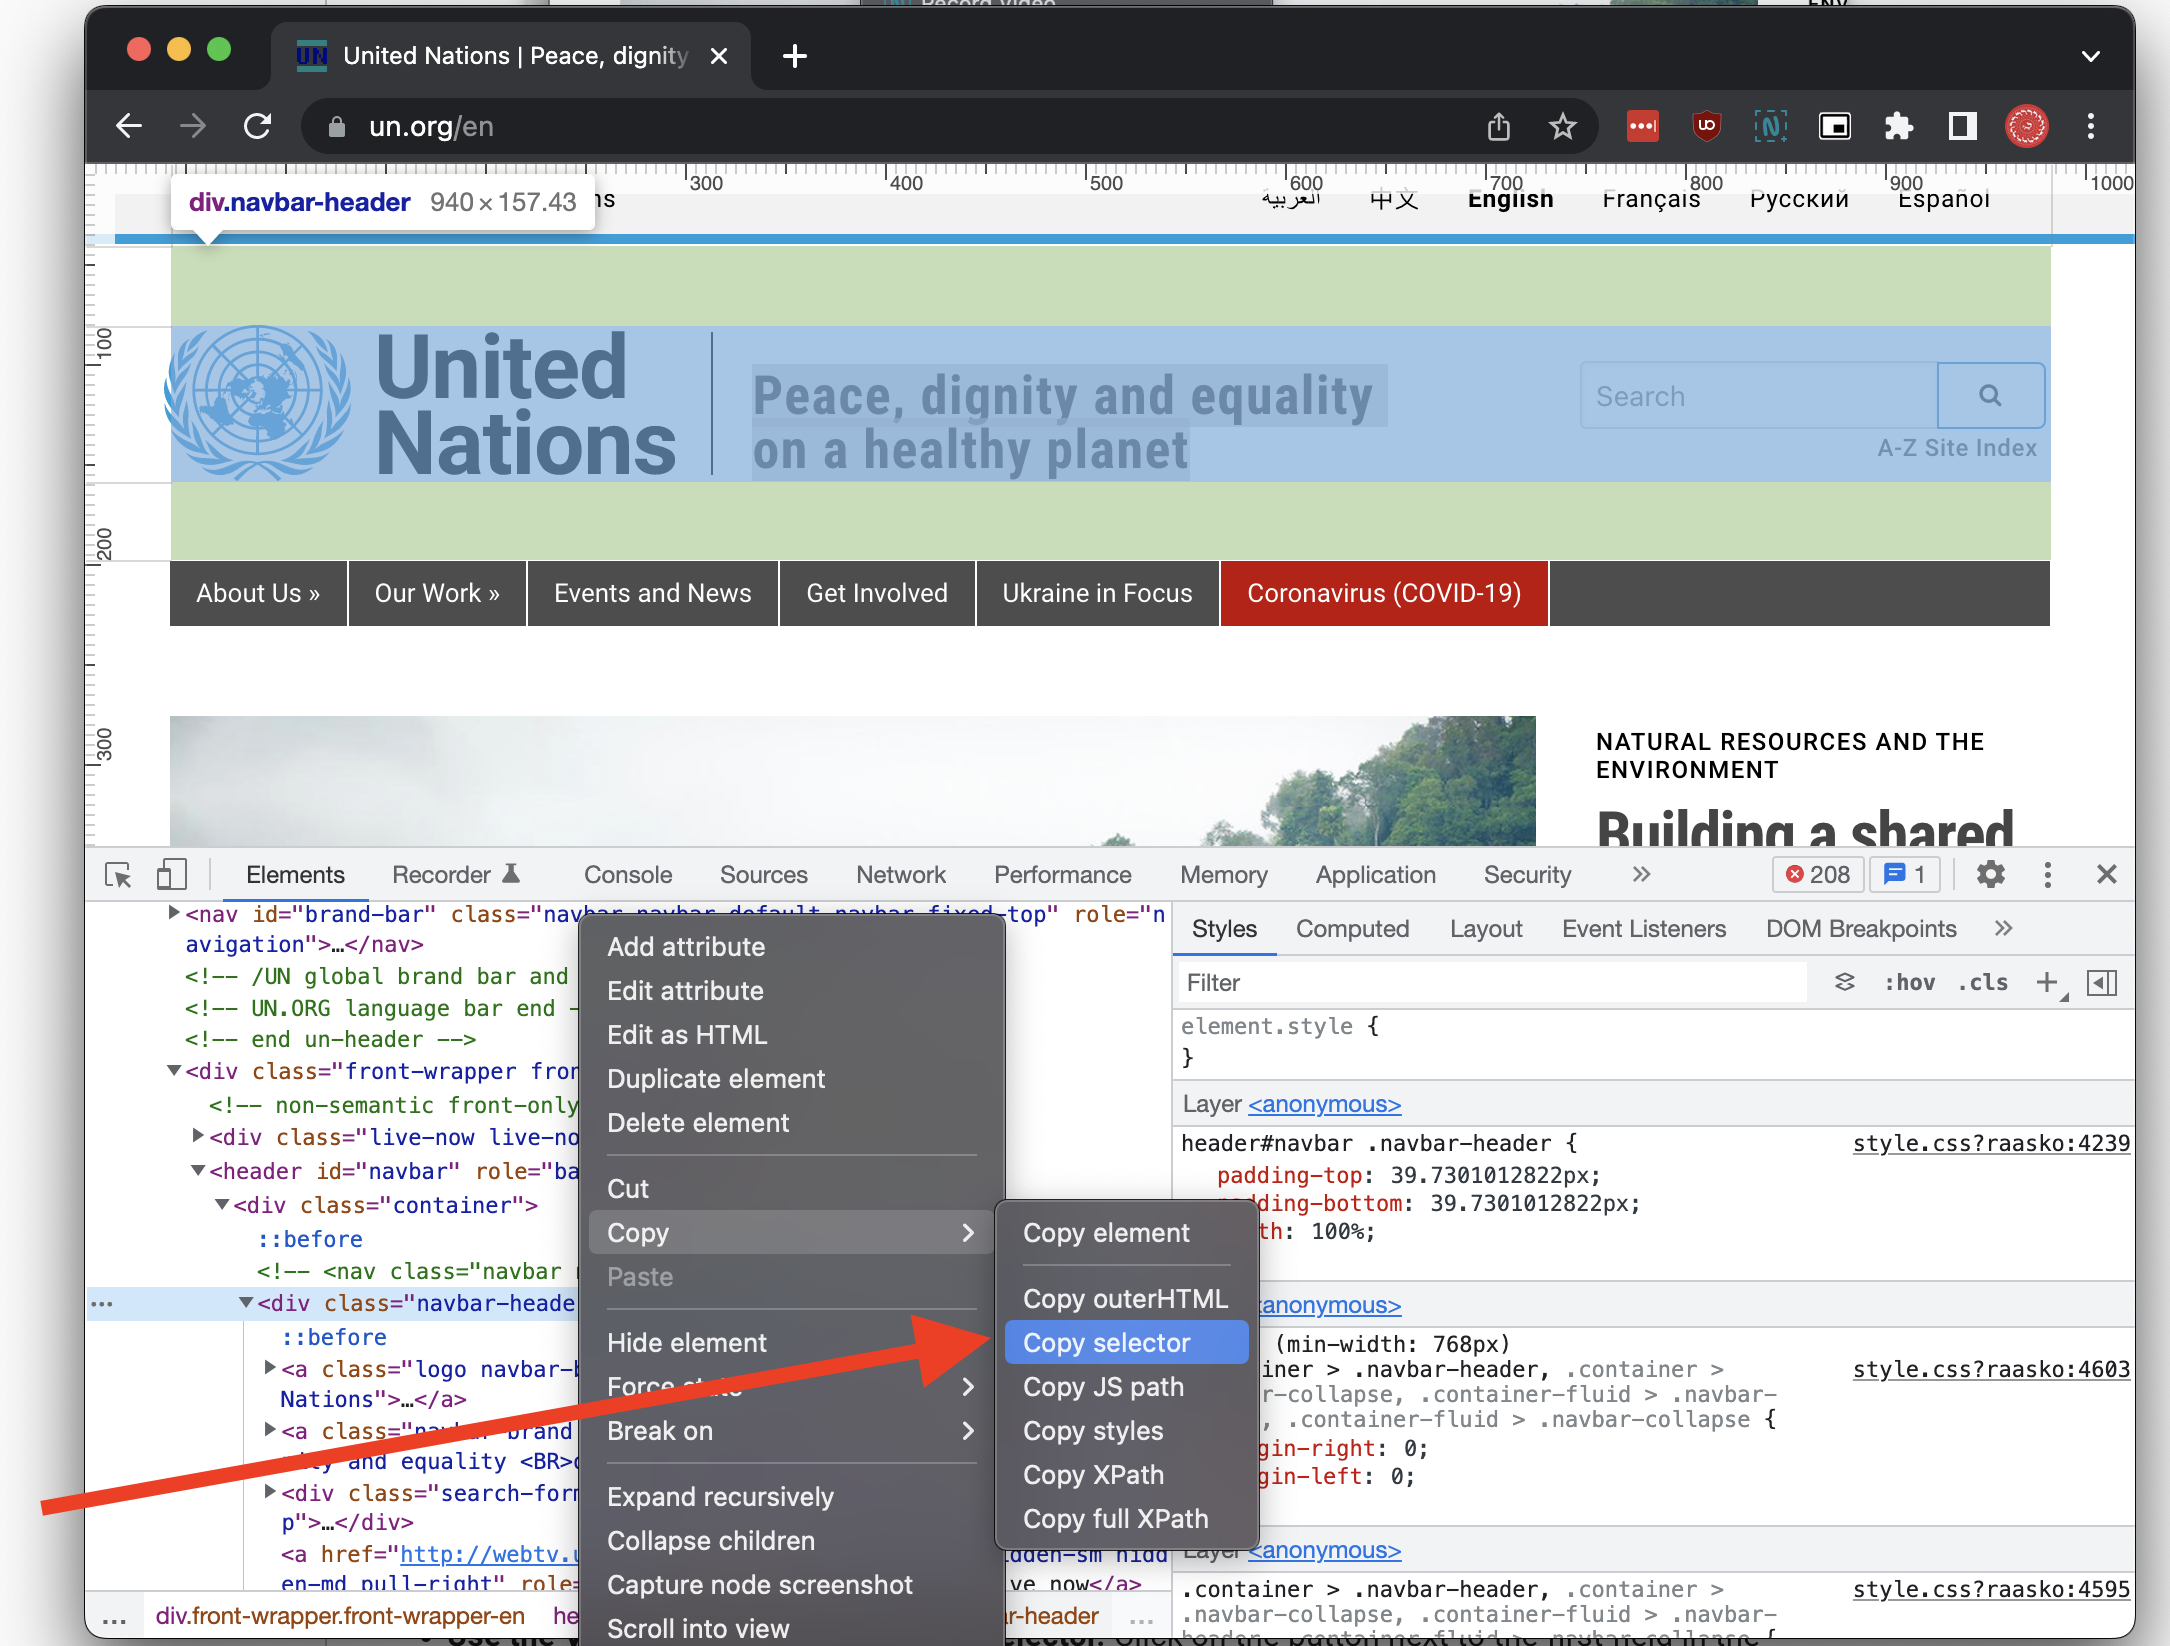
- Right-click on the HTML element in the code console. Select “copy” and then “copy selector.” This will copy a lengthy selector identifying that particular DOM element.
- Paste it into the filter area. When the crawl occurs again, this area will be excluded (or exclusively included, depending on which filter you are using).
- Tips to keep in mind:
- When you use the above method, you may get a very long selector. As much as possible, try to reduce the selector to a minimal core. Try to eliminate any hierarchical elements in the selector. This is necessary to reduce brittleness. For example, if you have a selector that relies on multiple hiearchical and class elements (e.g.,
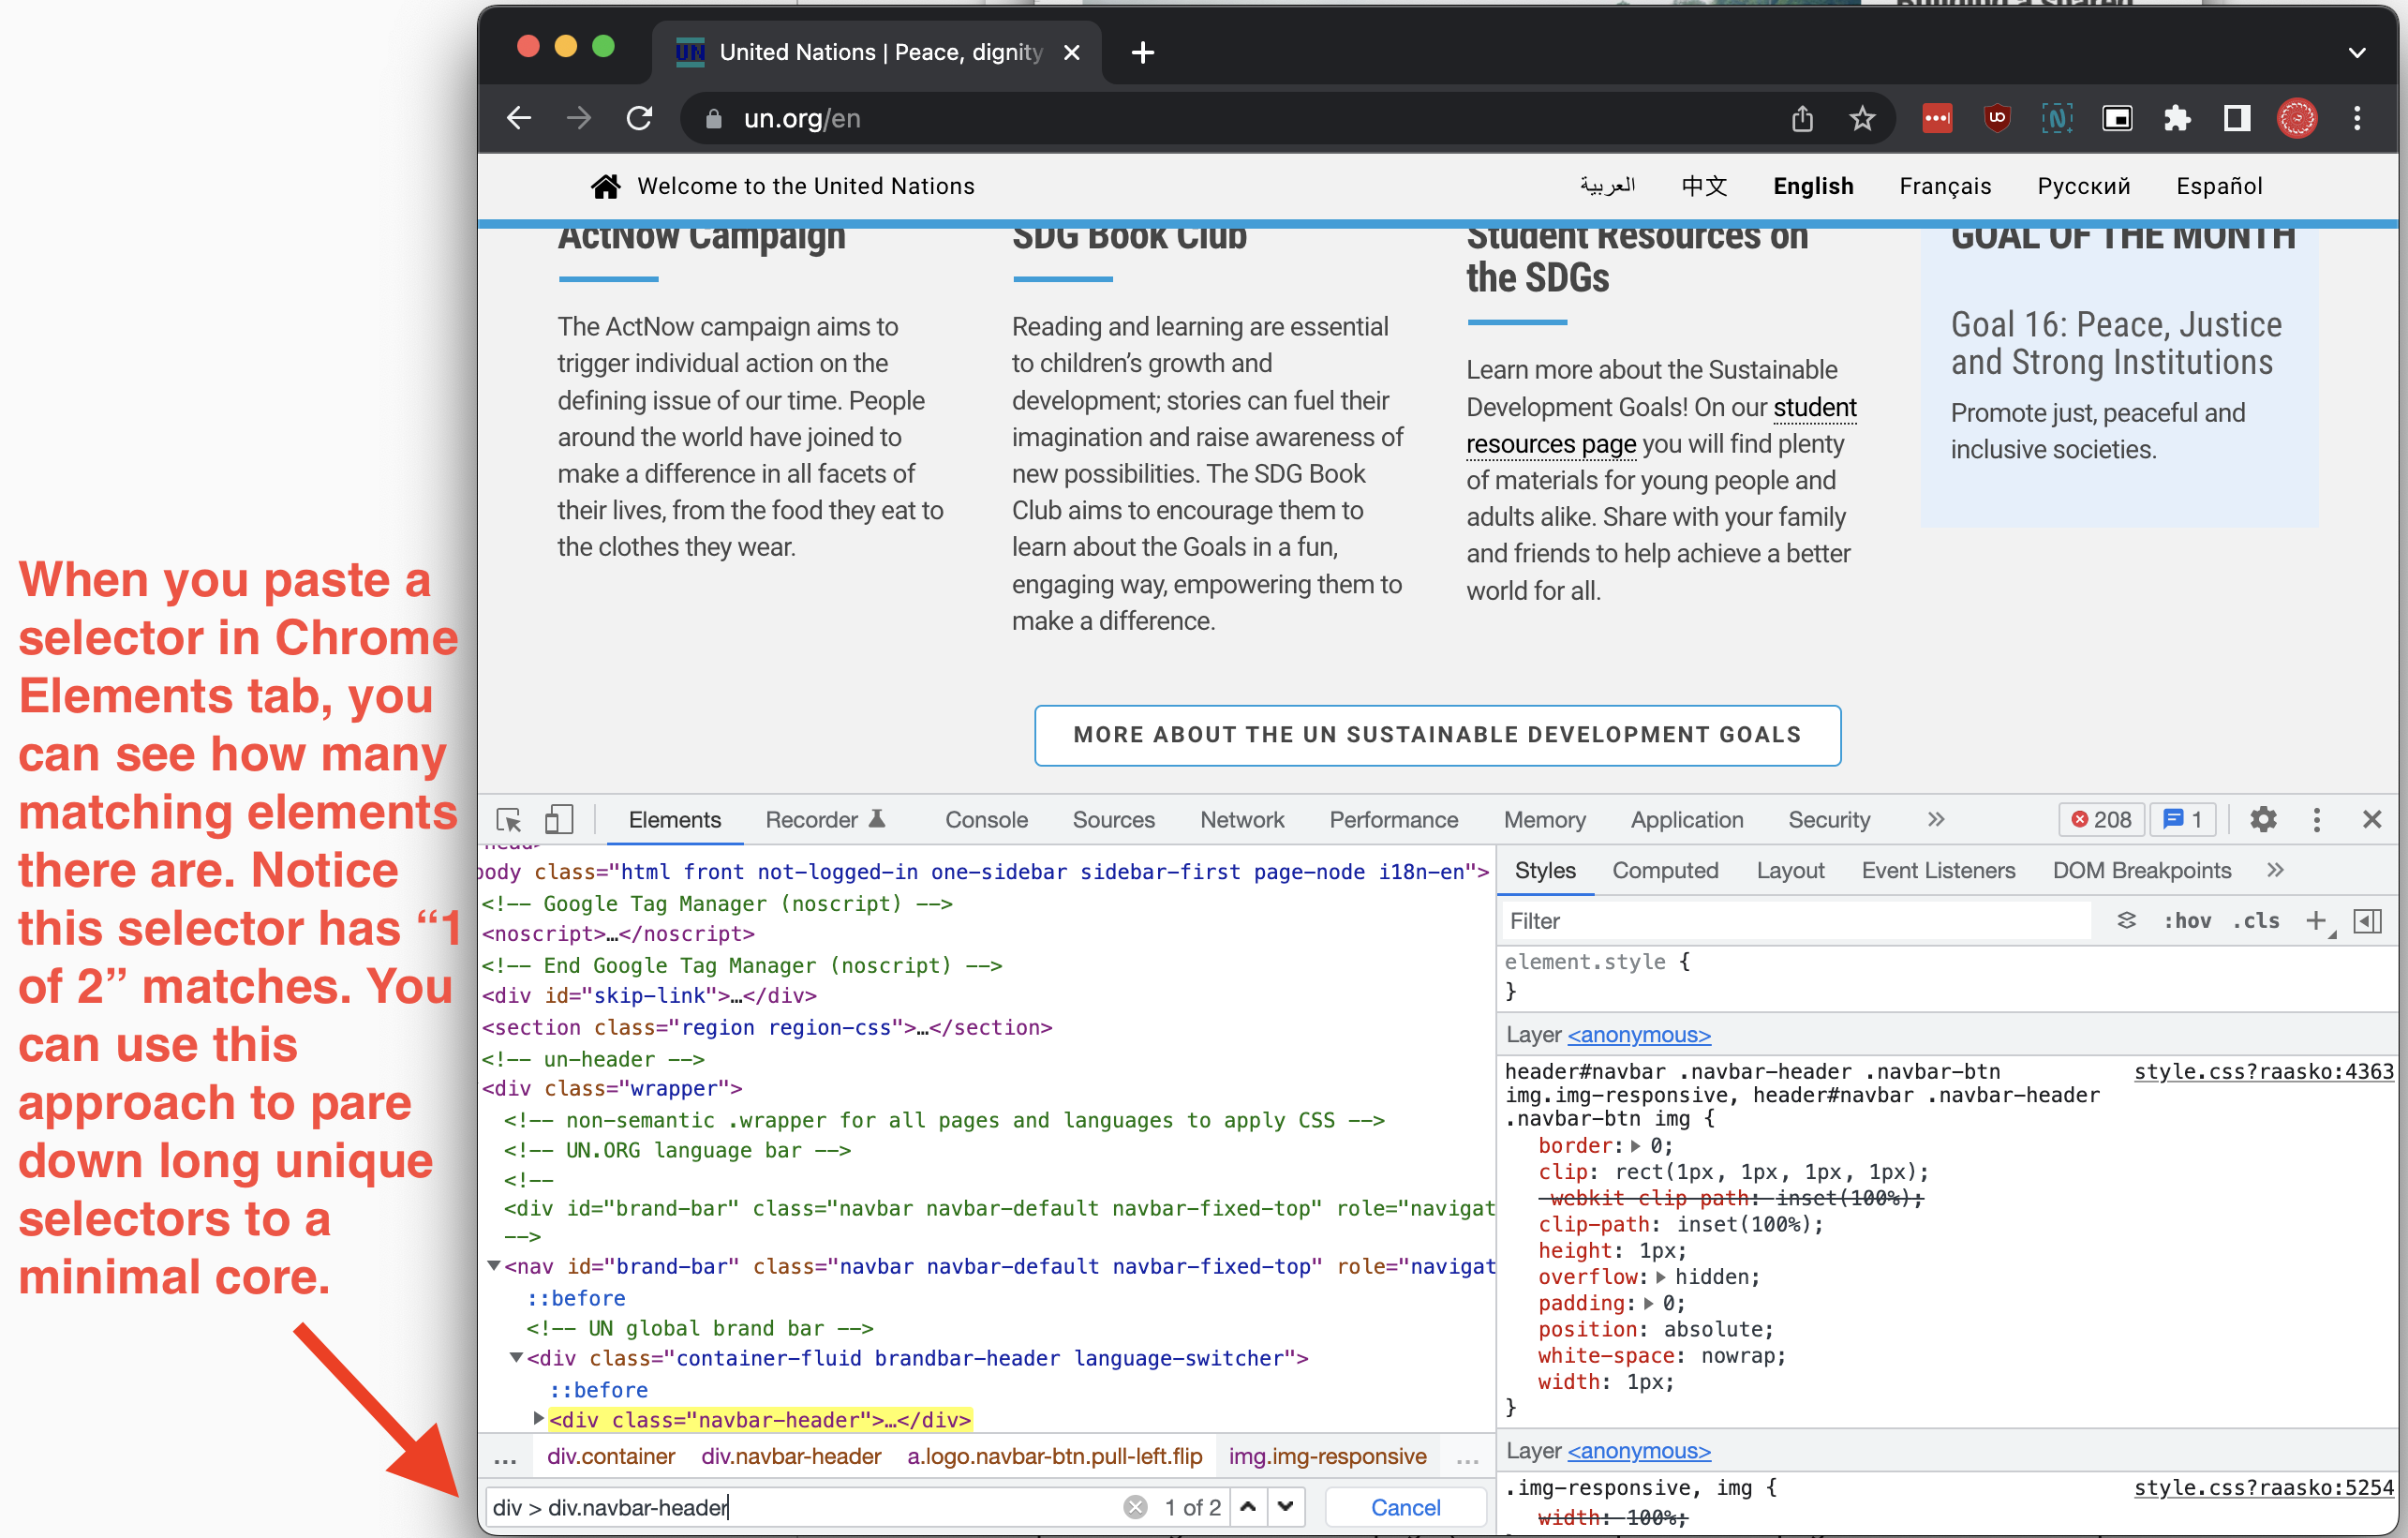
#navbar > div > div.navbar-header > a.logo.navbar-btn.pull-left.flip > img), then it will break easily if the site adjusts its layout or class structure even slightly. - You can paste a selector directly in Chrome’s Elements tab (the same one where you copied it from). When you do this, Chrome will tell you how many matches that selector has on the current page. Using this method, you can edit the selector down to a minimal core that still exclusively matches the areas you wish to filter.
- When you use the above method, you may get a very long selector. As much as possible, try to reduce the selector to a minimal core. Try to eliminate any hierarchical elements in the selector. This is necessary to reduce brittleness. For example, if you have a selector that relies on multiple hiearchical and class elements (e.g.,
Fluxguard does not have a button to immediately crawl all sites at the same time. Rather, for each added site, you can choose a crawling frequency.
However, some customers do wish to manually activate crawling. To do this, click into each site and click the Play icon. This will manually start crawling for that site.
If you want to manually start crawling for all sites, here is a trick to help you do that.
- Go to Account Settings / Bulk Adjust Crawl
- Use the “Bulk Adjust Crawl Frequency” feature. Change the crawl frequency to “Hourly”. Wait a few moments. Provided that you have not started crawling for any of those sites in the last hour, all sites will proceed to crawl.
- Change the crawl frequency back to “Manual”.
Change Monitoring
Yes. Pixel modification is one of our core change detection strategies. You may refine it by excluding specific areas of a page via CSS selector, and by setting a pixel threshold. We provide two ways to explore visual differences, including a slider view and a single-image overlay that highlights pixel changes in red. Learn more.
By default, visual change monitoring is a secondary change analysis that Fluxguard performsafter a primary change detection strategy—typically text monitoring—records a new version. You can adjust Fluxguard to use visual change monitoring as the primary strategy. Learn how.
Yes. This is Fluxguard’s default change detection strategy. We look for changes to text viewable by end-users. Deletions are highlighted in red, and additions in green. A multitude of advanced options is provided to dismiss or prioritize keywords. Learn more.
Yes. You can enter a list of keywords and phrases and Fluxguard will announce when they are added or deleted to any monitored page. You can also create an Ignore Keywords list to exclude phrases from change monitoring. Learn more.
Yes. In fact, we offer rendered DOM change monitoring. We capture and compare the HTML after Javascript execution. This is critical as much of today’s web is dynamic and loaded via Javascript. We sometimes will refer to this as DOM change monitoring—the DOM (Document Object Model) better reflects the complete rendered HTML after Javascript execution.
By default, HTML/DOM change monitoring is a secondary change analysis that Fluxguard performsafter a primary change detection strategy—typically text monitoring—records a new version. You can adjust Fluxguard to use HTML/DOM change monitoring as the primary strategy. Learn how.
Yes. This is a powerful way to detect security issues and data exfiltration. We analyze complete network activity from every monitored page. These are categorized by type, such as fonts, images, XHR, CSS, etc. We alert differences to new or removed network activity. Advanced options allow you to whitelist domains and focus change detection on certain network types (e.g., Javascript loaded from new domains).
By default, network monitoring is a secondary change analysis that Fluxguard performsafter a primary change detection strategy—typically text monitoring—records a new version. You can adjust Fluxguard to use network change monitoring as the primary strategy. Learn how.
Yes. Fluxguard offers multiple ways to ignore or focus on certain areas, including CSS filters, network blocks, DOM attribute ignores, keyword focus lists, etc. We also offer Natural Language Processing—a subfield of machine learning—to summarize content changes by topic. We recommend you get started with Inclusion and Exclusion Filters.
Side-by-side comparisons and version views are our best approximation of the underlying HTML from the monitored site. We are loading that HTML within iframes. To ensure a tamper-free environment, we remove all Javascript and some other resources from loading prior to display. This can result in some areas not looking quite right. That is expected and nothing to be concerned about. If some of the display issues hide key content areas (for example, behind an interactive element on the page), you can force these to stay open by inserting style instructions in Session Settings.
Simply navigate to Session Settings, go to the General tab, Advanced, and look for Viewer Helper CSS. Anything you enter here will apply to every page in the monitored site and session.
Data and Reports
It depends on your subscription plan. We indefinitely preserve a set number of versions per page per plan. Once you exceed this number, the least recent version is expunged for every new version detected.
We currently preserve 3 versions per page for the free plan; 25 versions per page for the Periscope (10k credits) plan; and 100 versions per page for the Telescope (25k credits) plan. If you unsubscribe, then the number of versions preserved will revert to the free plan.
Many customers have compliance needs that demand a specific preservation period, such as 3 years, 5 years, and even 10 years. Please contact us so we can customize a plan just for you. We can extend preservation periods to meet your needs, and work with you to engineer an off-site backup plan that downloads all captured versions on a schedule that makes sense for your use case.
Yes, you can download zips on a capture-by-capture basis. From Page View, click the arrow icon next to each capture. The generated zip will include multiple screenshots, HTML files, network activity, and associated comparison files. A manifest file will be included. Since the zip for a single capture can be bulky, at present, we only support downloads on a capture-by-capture basis.
You may also download a CSV file that includes details on every page monitored in Fluxguard. This will include links to the most recent version, as well as other valuable data. Look for this option at the bottom of the Dashboard.
Yes. From the Dashboard, you may paste a list of URLs to include.
By default, Fluxguard sends a daily summary of all the changes. This can be adjusted in Account Settings to send right away, or every week, etc. You can also limit emails to only reference changes from sites that you’ve included in specific categories.
This is Fluxguard’s core use case. So, you simply need to add the site or URL that you wish to monitor. This page will be crawled daily, and you will receive email alerts every day with changes. Need to monitor more than a single page, at a different frequency, or receive alerts more quickly? Read on.
- Add a page or site you wish to monitor.
- After adding a new site, you will arrive at the Session View for that site. You can always get back here from the Dashboard. It’s here that you can enable monitoring for newly found pages from this site. You can also adjust crawl settings, including crawl frequency.
- Wait for the initial crawl to complete. Once you do this, you will see a list of additional URLs discovered from this one page. At this point, you can enable monitoring for these pages.
- Click the gear icon in the Session View to go to Session Settings. It is here that you can adjust many settings, including crawl frequency and options for finding and automating monitoring of newly found URLs.
- Need to adjust email frequencies? You can do this in Account Settings.
Account
Yes. You can add more users, and grant them read/write permissions, in Account Settings.
Yes. You can add more users in Account Settings. You can grant each user admin, annotator, or read-only permissions. Each user can adjust the notification settings of their account to receive reports at their preferred frequencies.
The best solution for this is to create multiple subscribed accounts. This way, you can partition different teams into individual accounts. However, you can also use Fluxguard site categories to help do this even in a single upgraded account. Here are some sample instructions you might send to a team member:
- Create an account at Fluxguard. To do so, please visit: https://app.fluxguard.com/signup
- Ask your Fluxguard account administrator to add you into the Fluxguard parent account.
- Logout and log back in. You will now see the shared Fluxguard dashboard for your team.
- Go to the Org Admin area and add a category specific to your team. You can do this here: https://app.fluxguard.com/settings?tab=org
- Go to the User Admin (https://app.fluxguard.com/settings) area and look for “notification settings.” Adjust the email alert frequency to your liking. Make sure to select your category so you only receive alerts for changes to sites you care about.
- Go back to the Dashboard. Note that you can “filter by” the category you just added. When you do this, you probably won’t see any sites (as you haven’t added any yet).
- Click the “Add Site” button. When you add a site, please make sure to assign the site to the category you created.
- Once you have added the site, you will arrive at the Session View. Click the gear icon to open Session Settings which is where you can adjust many of the crawl settings for Fluxguard.
- Wait a few moments and the crawled site will appear. Notice that up to 75 (or 150 for subscribers) pages are newly found. You can manually choose to monitor none, some, or all of these pages. You can adjust the URLs we find and monitor in the Session Settings modal in the Discovery tab.
Fluxguard allows customers to create arbitrary categories to better organize sites and optimize reporting.
- Create categories in Account Settings > Team Settings. You can craft categories in any form that better meets your business needs: for example, you might create categories by business unit, analyst name, or jurisdiction.
- Add sites to categories:
- For new sites, a drop-down menu option will appear allowing you to optionally select categoreis for any newly added site.
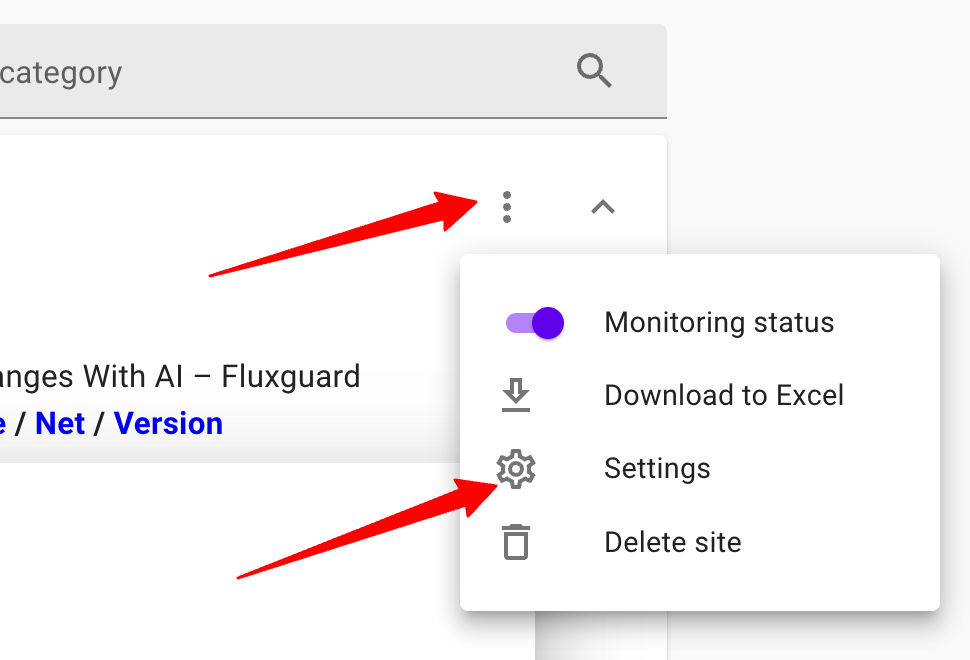
- For existing sites, go to Settings for each monitored site. There, you will find options to add the site to your existing categories. To get to Settings, go to the Dashboard, ensure you are viewing cards in Detailed layout, and utilize the 3-dot menu next to each listed site to select Settings.
Once there, look for the Site Categories option:
- For new sites, a drop-down menu option will appear allowing you to optionally select categoreis for any newly added site.
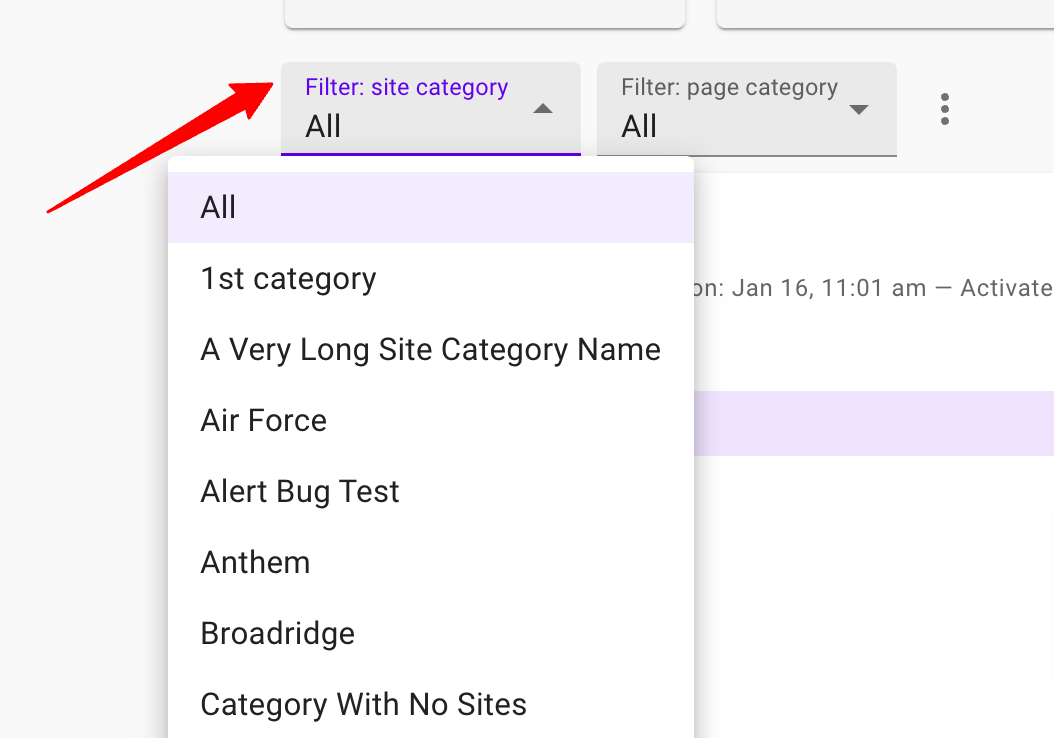
- Filter your Dashboard by site categories. When you create site categories, you will note new filter options on the Dashboard to better explore your organized sites:
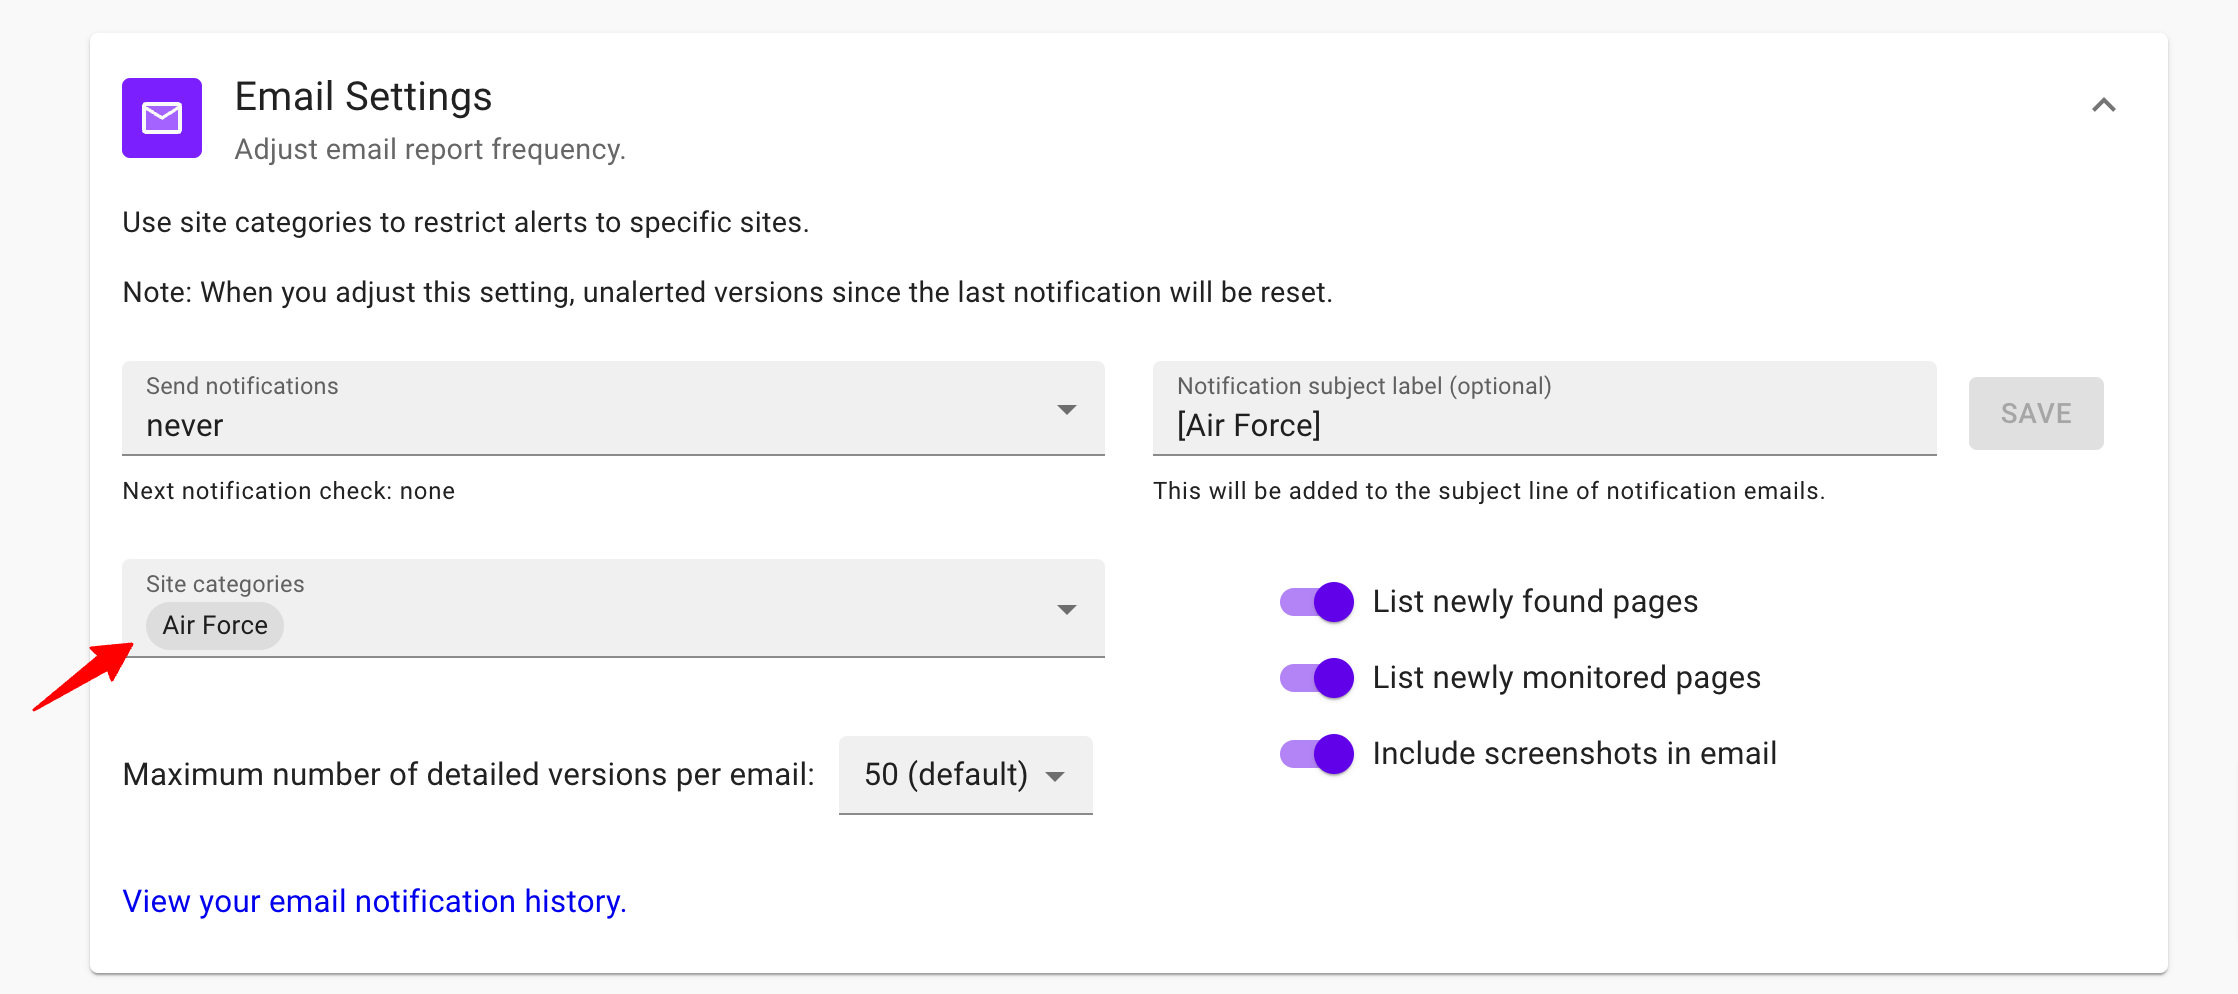
- Customize recipient emails with site categories. Each user in your Fluxguard team can now use categories to tailor reports to their specific needs. This can be done in Account Settings > User Settings:
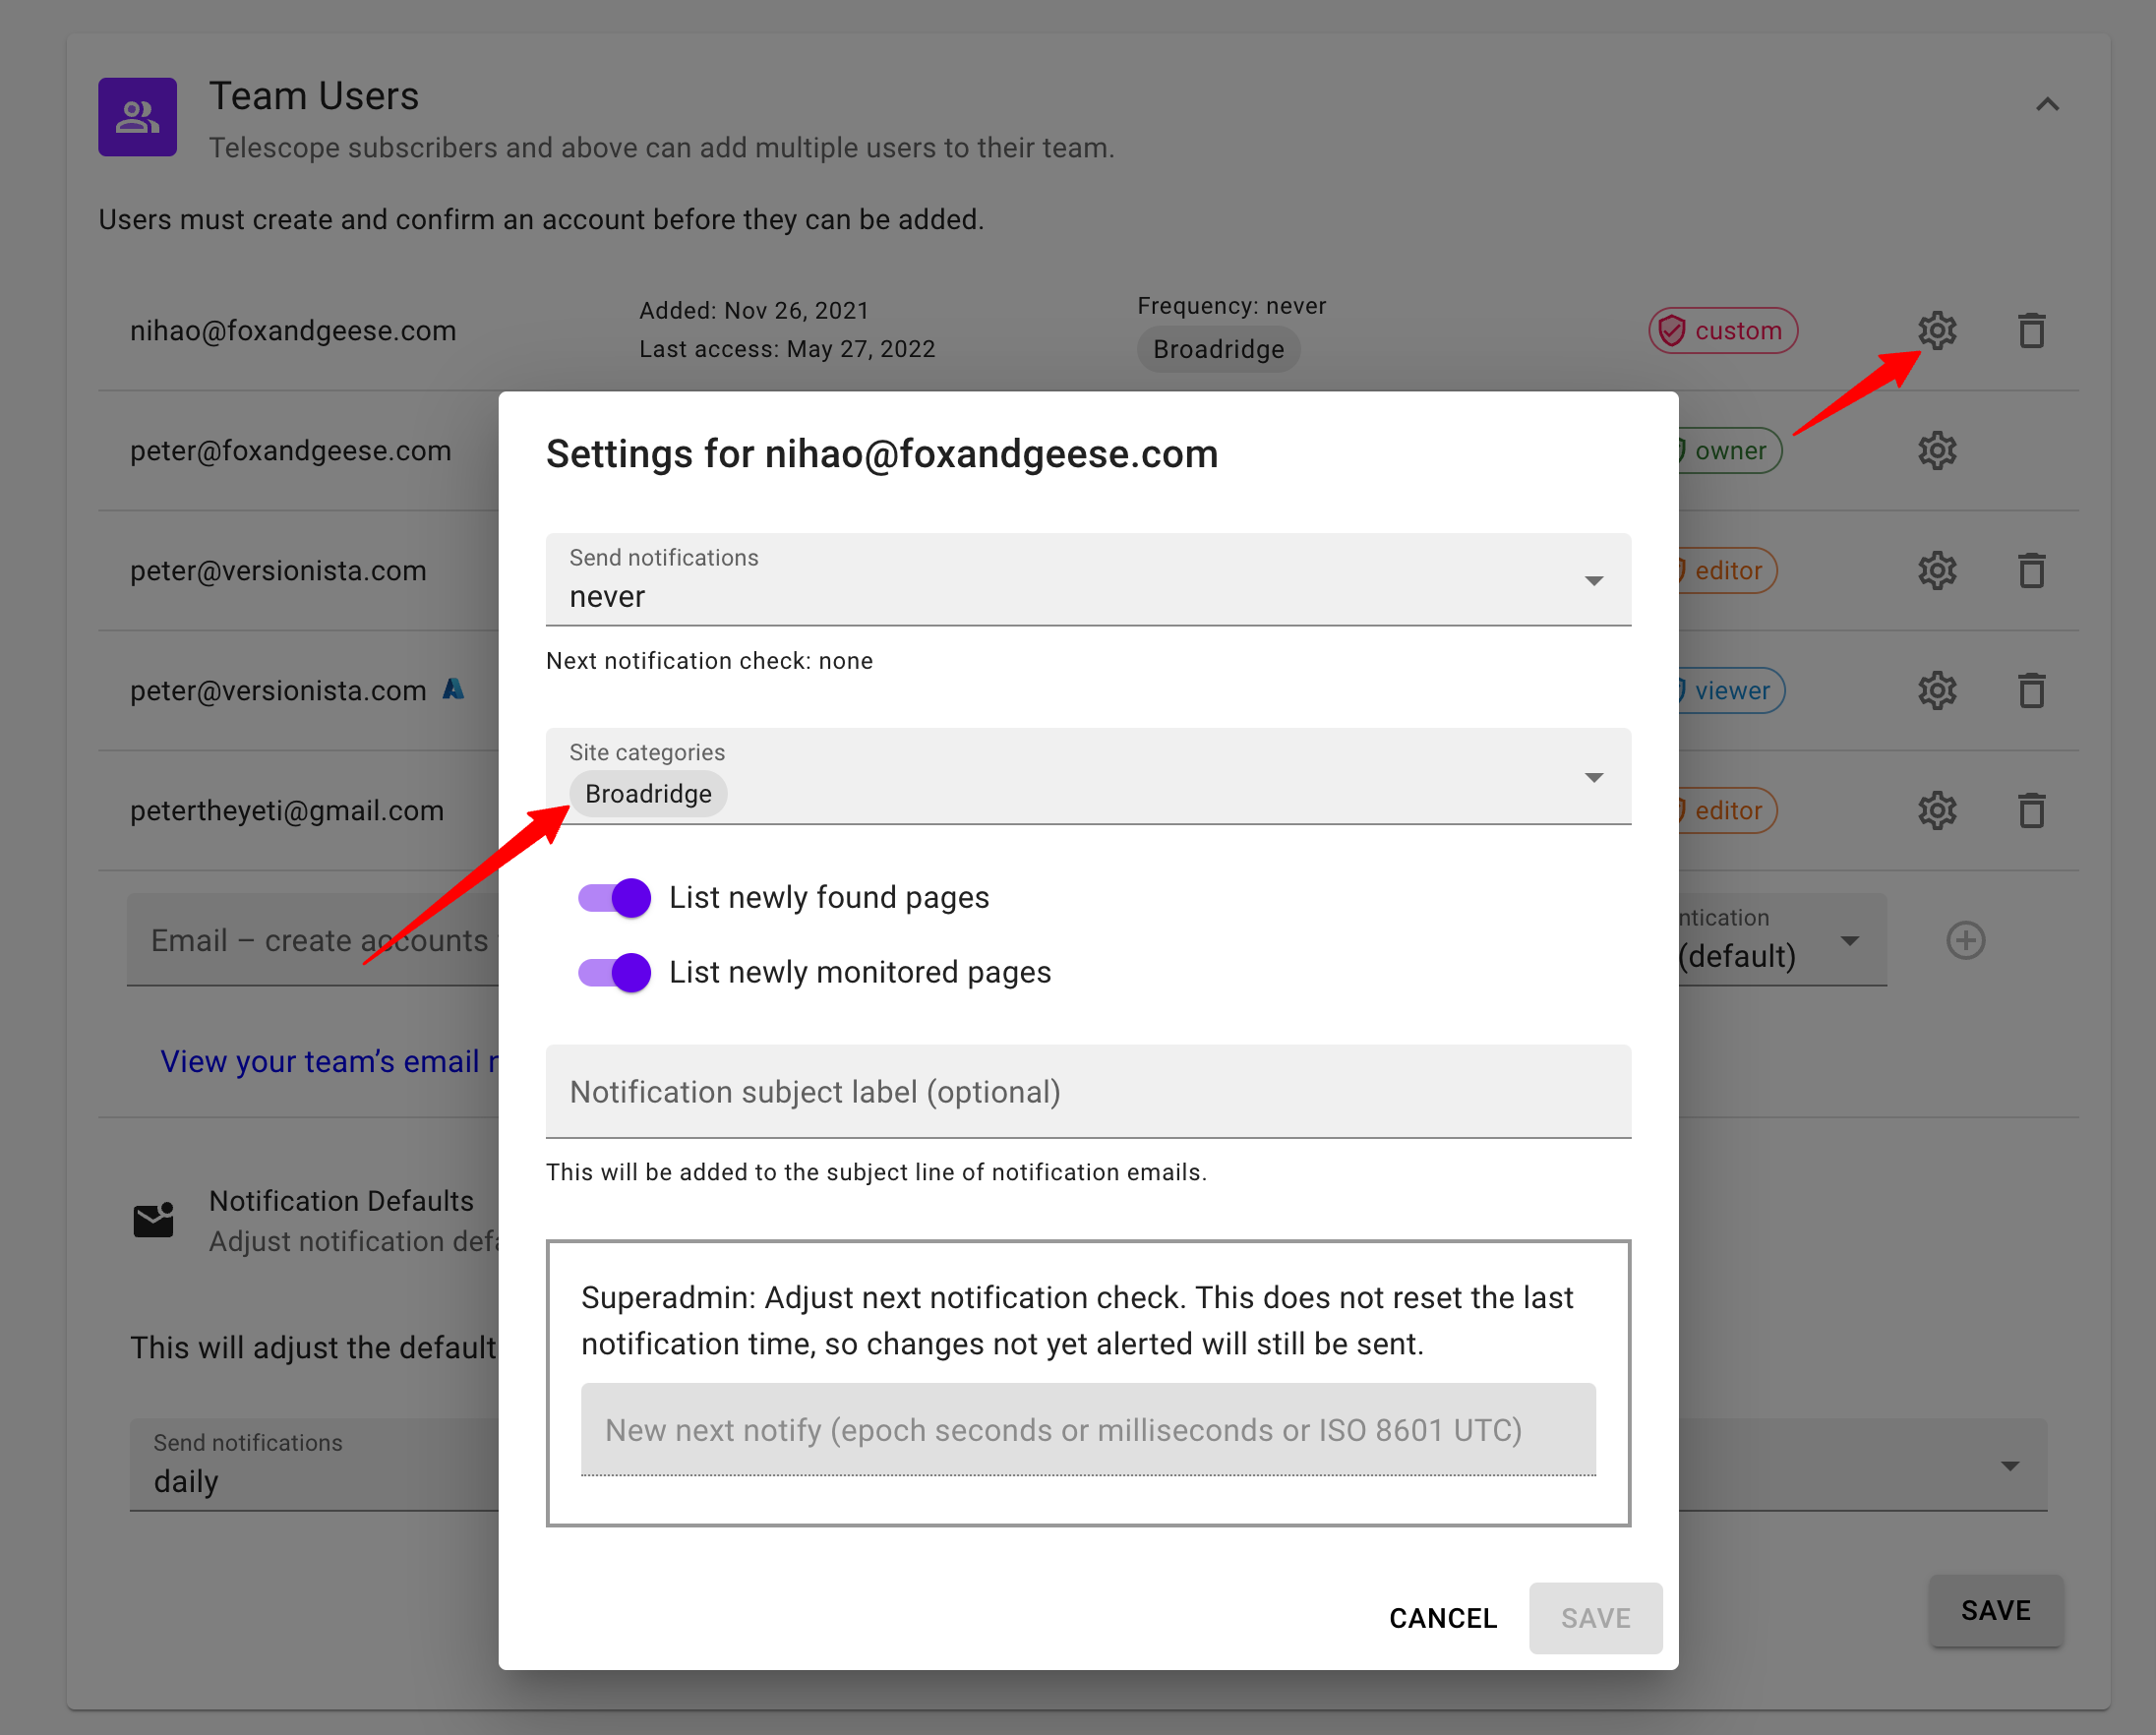
Alternatively, team administrators can customize emails for all recipients in Account Settings > Team Settings:
- You will find that adding categories opens up many other new options in Fluxguard, including the ability to mass delete sites by category, specify alerts to different subsets of sites in Slack and webhooks, provide a graphical chart on the dashboard by category, and more. Note that adding sites by US state name will create a map-based interface on the dashboard.
Other
Please look at our public archive of CDC COVID-19 changes as well as monitoring of BBC News.
Get Started with Fluxguard Today
Get a Guided Demo
Schedule a free 30-minute meeting with us to see how Fluxguard can work for your business.
Start a Free Trial of Fluxguard
Sign up for a no-obligation trial of Fluxguard and start monitoring websites within minutes.

